Sunday, December 30, 2012

Crazy for Tom and Jerry Christmas Punch Bowls

I like punch bowls for some crazy reason.  I REALLY like them. 
 I don't make punch, I just like to put stuff in them, like pinecones in 
these two huge pressed glass punch bowls in the 
Slewed Horseshoe pattern from 1908.


   Did you notice I forgot to put pinecones in one--oops!  :-)

Being born and raised in the South, I had never heard of the Christmas drink, Tom and Jerry--
until-- I came upon some peach luster punch cups at a local thrift shop and 
had to have them.  Once in my house, I liked them so much, I went on Ebay and 
bought the punch bowl with stand and more cups (usually filled with ornaments for Christmas, but it absolutely rocks with my Halloween and Thanksgiving decorations).


Knowing of my fascination with this genre of serving dishes, my girlfriend bought me these delicate porcelain cups for Christmas this year, also from a thrift shop (hubby even likes these):

 
During my after Christmas thrifting this week, I was amazed to find 
the following Tom and Jerry set for 12.00!!!!  (What a way to end 2012)!


And so there it is--the secret is out.  
I LOVE punch bowls.  

Saturday, December 29, 2012

Travertine Tile Coaster Tutorial

I've been working for the past few years at a place where frequent gift-giving is common.  You never know when you'll come into work and find a pack of 7Gypsies scrapbook paper or a lovely butterfly mug tucked into a cute bag along with a sweet card.  So to have a quick custom gift ready when appropriate for work or for a hostess or birthday gift, I made several sets of travertine coasters. They are easy and inexpensive to make and would be a great project for a group crafty night!

I'm linking this post to Open House Party.


Items you need:


From Home Depot
    Travertine tiles -- about $4.00 for 9 tiles

From Michael's or JoAnn's
    StazOn ink pad in Timber Brown
    E-6000 glue
    Felt

From anywhere
    rubber stamps (I love Oxford Impressions.)


Wipe tiles with damp paper towel to remove dust
Notice that some tiles will be smoother than others.  
Press stamp pad on stamp until it is wet with ink.  Re-ink pad if necessary.  You must use a permanent, quick-drying ink like StazOn.  My ink pad is several years old, so I found it necessary to re-ink a few times while doing the project just to make sure the impression transferred well.
Stamp detailed images on smooth tiles.
Stamp images with fewer details (fewer lines and more solid areas) on the rougher tiles.
Continue stamping tiles until you have the number you want for your gift.
To finish, cut felt on paper cutter (or by hand) to be a slightly smaller square than the tile.  
Line the back side of the tile with E-6000 glue, about an eighth of an inch inside the edge.  
Put the felt square on the glue and press all over.  Let the glue dry for a few hours or overnight.  

Stack finished tiles and tie with bakers' twine and ribbon.

 Keep several stacks on hand for a quick and nice gift any time you need.

NOTE: No top coat is needed.  The travertine will absorb moisture from glasses and the ink won't wear off.


Wednesday, December 26, 2012

After Christmas Decorating

I hope I'm not the only person who keeps putting out Christmas decorations after 
December 25!  I usually start in mid December (just hate to rush through Fall), 
so there is never enough time to do everything I want.  And I love the relaxed 
feeling when the hustle and bustle is over, and my town seems to just 
slow down a bit.  I'm so happy to have a break from my usual routine and
 focus on decorating, which really means enjoying all the beautiful pieces 
that I have accumulated over many years from my grandmother or mother or 
from special times and places.  Some of my life's story and the life stories of so many others
can be told in what I have collected. So I'll just carry on with my "Christmas" decorating and 
remembering and being thankful for the special people and places 
that have been a part of my life.  What nice remembrances.
Mantle and Fireplace in  My Family Room


Monday, December 24, 2012

Christmas Decorating

 Happy Christmas Eve!  
Wanted to share a few pictures of the decorating I just finished today.
I'm so behind this year--no baking, no cards, only a couple of gifts... 
Too many things to do, upsets, annoyances and minor health
 have gotten in the way the past few months--and a lot of crafting!
But my heart is full of joy and peace. 
And  I wish you joy and peace as well.
                        
Sideboard in my kitchen
My collection of vintage rulers    


A vintage nativity

 A view of my tree
I really wanted to put up several trees, but there just wasn't time.  
I'm thinking that I'll just keep on going all through January and
 have Christmas through March!

Saturday, December 22, 2012

A Little Bottle Brush Tree Crazy!

Do you ever find reason to laugh at yourself?  I sure do.  This month I've laughed at myself on two occasions-- laughed loudly-- almost uncontrollably!  :-)  One of these occasions has to do with my little obsession with bottle brush trees.

It all started with Pinterest--waaaaayyyy too many waaaayyy cute things made with mini bottle brush trees---bottle brush trees under glasses, bottle brush trees in salt shakers, bottle brush trees dyed pink... you get the idea.  I knew I had a bag of green trees from last year, but couldn't find them, and they were the wrong color anyway.  In search at Michael's,  I discovered these small packs of ivory trees--the preferred color:
 
 So I bought three.  And used them all!  That's when I panicked!  Had to have more.  So I called all the local Michael's--sold out.  YIKES!  Would I actually have to wait until NEXT Christmas to make all those cute creations swirling in my head???? 

Then I discovered on PINTEREST that you could bleach the green trees.  That made me look hard for my trees, and lo and behold, I finally found them--under a pile of old books and Christmas tree garland in a box in a corner of my garage!  Hurray!   I couldn't wait to start bleaching.  

One pinner's instruction was to put the trees in bleach and then in vinegar to stop the reaction.  Eagerly I put on two right-handed rubber gloves (all I could find), got tubs ready, and began the process in the kitchen.  What a smell!  (My husband moved me out to the garage.)  I soon got excited!  The green trees were becoming ivory before my very eyes!  But they were also turning a little dark--especially in the center...


Well, you're probably crafty and very ahead of me, and you probably guessed why!  Vinegar rusts metal!  Doh!  I was not happy.  These trees didn't look elegant--they looked very primitive.  Now I had no true ivory trees and fewer green trees!  My heart started beating fast--a near panic attack coming on.  How would I possibly have enough now to make gifts for everyone? Could I dye these back to green and hide the rust?  I tried a few more using only bleach and was please with the result.  Before bleaching my entire stash, I used a few green ones in vignettes, and decided green with snow was kinda nice.  Now I didn't want to use up all my green trees!  What to do?  


  Poor hubby...every time afterward that we went out together I asked to stop by Michael's or JoAnn's to look for trees.  I finally found a bag for 60% off.  The stash was growing.  Still wasn't sure I had enough.

 Then a few mornings later, as I was feeding my addiction to daily deal craft sites, I found trees on The Plaid Barn.  Hurray!  I ordered 3 bunches--twelve altogether.  Aaaaaaahhhh.... that ought to be enough, I thought.


and they bleached really well:


I had quite a few trees at this point:


 Then about a week afterward, hubby and I stopped after brunch at a nearby thrift shop.  Guess what I found??????  A whole bag of green trees for $4.00!   So I HAD to buy them!  You can believe I walked very sheepishly out to the car where hubby was waiting.


My collection was quite large now. 

And just to complete my obsession, I bleached a couple of large ivory trees that had gold glitter and terrible fake balls.  Before I knew it, I had a box full of trees and I just had to laugh and laugh.  Do you think I have enough to work with now?  :-)


Monday, December 10, 2012

Chalkboard Style Christmas Banner


 In trying to keep with a neutral Christmas, I made this JOY banner.  I cut black chipboard and rubbed it with chalk to give it the chalkboard look.  I white embossed the letters from the Giant Alphabet collection from Oxford Impressions, and the label from O.E.'s Sleigh Bells collection.  Along the top edge, I attached a punched snowflake trim. I embellished with various scraps of vintage lace, rhinestones, buttons, and cut outs.  Silver tinsel trim and a spritz of shimmer finish it off.

Linking up with Knick of Time Christmas in July Party!
And these other great parties:
Make It Pretty Monday at The Dedicated House
Tweak it Tuesdays at Cozy Little House
Wow Us Wednesdays
Transformation Thursday @ The Shabby Creek Cottage
Creative Things Thursday @ The Vintage Farmhouse 
Blog Stalking Thursday @ The Crafty Blog Stalker

Another Christmas Shaker Card

This is another shaker card I made using a frame graphic from the Graphics Fairy and stamps from Oxford Impressions.  The background music is from an old hymnal.  Inside the window are gold stars and red glitter that move when the card is tilted.

Friday, December 7, 2012

Salt Shaker Christmas Ornament


I've seen a few of these upcycled salt shakers on Pinterest and decided to make a Christmas tree ornament out of one.  I started with inexpensive glass shakers from a restaurant supply-type store -- 6 for about 8.00.  To age the stainless top, I sprayed with gold paint, sanded, and repeated the process.  I sealed it with spray varnish. I glued a filigree piece with a vintage button on top and threaded a cord through the holes.  I trimmed it with rhinestones and a piece of vintage seam binding.  The words and emblem on the front are a rub-on.  I plan to make more for gifts.  It's surprisingly quick and easy for all its elegance.

Wednesday, December 5, 2012

A Sparkly Christmas Shaker Card

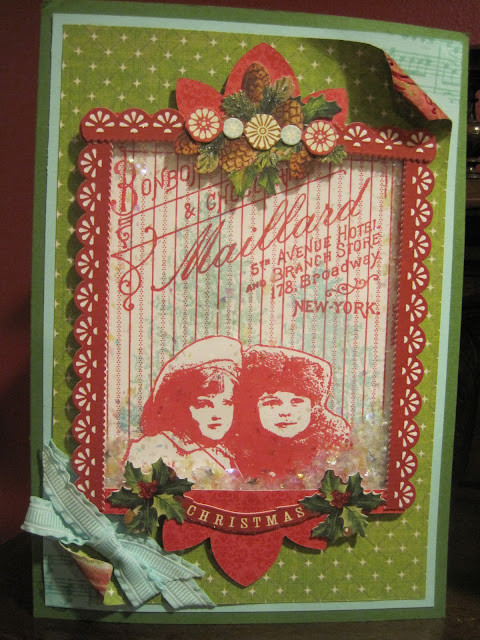
Christmas time has always felt to me like glassy snowflakes, elegant store windows, and beautiful sweets--so I tried to create a card to capture this atmosphere.  I made a window out of old transparency film and double-stick foam. I stamped the kids in a French candy store on a white scrap, added mica flakes, and then encased it all with pre-printed trim. It "snows" inside the window when the card is tilted. 

 All the stamps--music, French sign, children, and aqua pine trees in the background are from Oxford Impressions Stamps.  


Tuesday, December 4, 2012

Chalkboard Christmas Card

I've had this chalboard style on my mind all day, so I couldn't wait to get home from work and try to put a card together in that style.  I spread chalk all over a black piece of card stock, white embossed the trees and greeting, and then added hemp cording, a scrap of vintage lace, and a few other embellishments.  I finished it off with a spritz of shimmer.  I quite like it.  What do you think?